How to Transfer WordPress Site to a New Hosting Plan Easily?

By James Flarakos | December 2, 2021
Table of Contents

Looking for how to easily transfer your WordPress site to a new host?
Then this guide will show you what’s the best way to move your site from a new host or even change hosting plans in SeekaHost.app the cheapest WordPress Hosting.
Why Transfer WordPress Site Over To SeekaHost?
Before getting in to the guide, lets check out some reasons to why you might want to transfer your WordPress site over to SeekaHost.
Please be aware that this method is free untill 256mb and then you will have to use a paid version for any sites over 256mb or to edit your wp-config.php file
Management Dashboard
We have created a unique dashboard, specifically designed for anyone no matter what your experience level to use and have all the best options at their fingertips.
No need to mess around with C Panel as we have added all the features you normally would get but in a more user friendly manner. Meaning that with no experience what so ever your still able to get started with editing your site, adding plugins, SSL, free business email, analytics and anything else we have to offer.
Free SSL For All WordPress Sites
Unlike some other hosts, we want you to secure your site with no monthly or yearly fee. With some hosts charging upward of $50 for a year after your first year for free, you need to choose a better long term hosting such as SeekaHost to make sure you dont get them hidden fees the next year and every year afterward as our is free forever.
Free Business Email
Want to look professional with a domain specific email address to use for your website? If you transfer WordPress site over to SeekaHost you will find you get this feature and again with no initial or re occurring charge. Its free to use your business email with any WordPress hosting package.
Great Customer Service
Our team has years of experience and has some of the best technically minded members to help you with any needs you might have. Meaning that no query goes unsolved and you get to enjoy the full potential of your website.
How to Transfer WordPress Site Guide
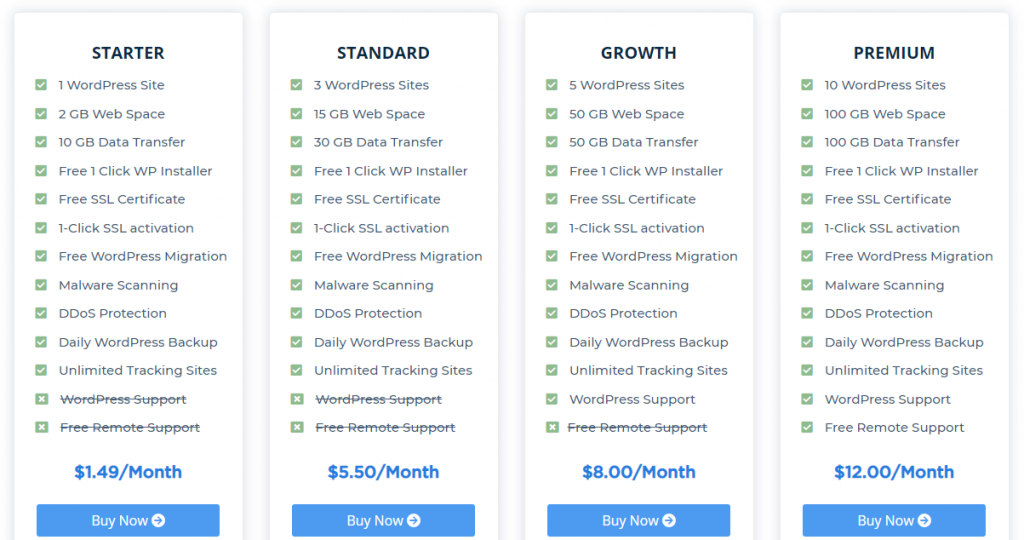
- Pick a package from SeekaHost that suits your requirement’s.

- Once you have selected your package then log into the back end of your website you are looking to transfer.
Tip: Use /wp-admin at the end of your domain to access the login area for the back end.

- Go to your plugins section, from there go to “Add New” and search for All in One WP Migration.
Then click install and activate.

- Hover Over the All In One WP Migration on the left of your dashboard and click on Export.
Tip: Make sure all your plugins and themes are up to date prior to exporting, and your SSL certificate is active.

- Choose Export To > File. Unless your trying to export it to another area or external storage system.

- Wait for the files to export and then click on Download.

- Now you have the complete back up of your website, you will need to delete the blog/website from the previous hosting so that we can add the copy to the new hosting with SeekaHost.
Warning: Before deleting the your website, be aware that this is free for any sites up to 256mb. If you website is over that size then you will need a paid version of the plugin extension.
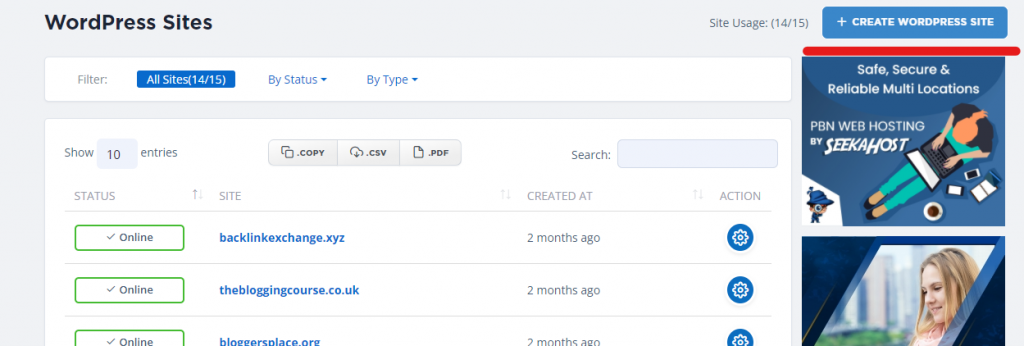
- Now head over to your SeekaHost acount and go to WordPress Sites > Create WordPress Site.

- Now fill in the sections with your domain and blog title and choose the package you purchased earlier with SeekaHost.

- Once the green tick is displayed then click on the action button on the right side of your domain name.

- Take a copy of your Nameserver 1 and 2 and then login to your domain hosting. (where you registered the domain)

- Find the Change Nameservers option and choose to use custom nameservers. Then simply change the nameservers so they match your new ones provided when adding your website to SeekaHost.
Tip: Most hosting companies will require you to unlock your domain to make changes, then lock it back afterward. make sure to lock it up as this is important once your done making changes.

- Go back to your WordPress site now hosted with SeekaHost and activate your SSL certificate.

- You can now log in to your site using the information provided.
Tip: If you arent sure how to log in to the back end of your website. Type /wp-admin at the end of your domain. For example www.mywebsite.com/wp-admin
Tip: Dont lose your original password and username as after we import the original website it will go back to that.

- Once logged in go to plugins and then add new plugin and we will download the same All In One WP Migration Plugin.
- This time once installed were going to select import.

- Select Import From File or Wherever you saved it when you exported your site ready to transfer.
Then select the download of your original site you made earlier.
(free for up to 256mb) or you can edit the code using this guide here.

- Wait for the website to import.

- Next up it will log you out no matter what you press on your site and you will have to log in using your original password and username prior to transferring your WordPress site.

- Last thing to do it head to your settings and re set your permalinks as this was set back to default with the move.
Increase All In One WP Migration Plugin Import Size For Free
You can change the wp-config.php file using the code provided below.
@ini_set( 'upload_max_filesize' , '128M' );
@ini_set( 'post_max_size', '128M');
@ini_set( 'memory_limit', '256M' );
@ini_set( 'max_execution_time', '300' );
@ini_set( 'max_input_time', '300' );
Conclusion
Although there are a number of steps to move transfer your WordPress site, this one is one of the easiest and free methods (depending on size of website) Alternatively you can also edit the codes on your WordPress to increase limits or of course go for he paid version.
We also provide a free WordPress migration service with SeekaHost with all our WordPress packages.


