
How to Use Cloudflare for WordPress Sites or PBN Blogs

By James Flarakos | June 16, 2021
How to Connect your WordPress site or Private Blog Network Blogs to Cloudflare and increase security and optimize it for faster loading pages.
How to Use Cloudflare Video Guide
Why Use Cloudflare For Your PBN’s Or WordPress Site
Security
This way of hosting your site through Cloudflare is ideal for anyone running a private blog network It provides a lot of extra security as they are using there methods as well as any added security you have. making phishing for much harder for hackers or bots.
“Your website, APIs, and applications are your key channels for doing business with your customers and suppliers. As more and more shift online, ensuring these resources are secure, performant and reliable is a business imperative. Cloudflare for Infrastructure is a complete solution to enable this for anything connected to the Internet”
Security also includes:
- Firewall
- DDoS Protection
- Rate Limiting
- Application Security
- Network Security
Optimization
Cloudflare also optimizes your site (dont run optimizing plugins at the same time) which will increase your page loading speed. This is essential as google and other search engines will rate you site on page speed also. If you page is really slow and many people look else where in stead of waiting then the search engines will recognise this and visitors else where.
They provide intelligent routing, Mobile and image optimization and video cache.
How to Connect My Site to Cloudflare
- Head on over to Cloudflare and create an acount.
- Choose a Infrastructure acount.

- Enter in your domain, with out the https://www. and select Add Site
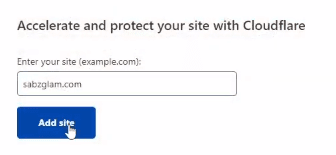
- Select the Free package unless you wanted a paid version with more features and then press continue.
- Once it has finished the scan of your DNS records it will show a list at the bottom of the page. Make sure there is a little orange cloud next to your domain name. And click continue.

- On the next page you will be given a list of instructions and name servers. This is you current name servers and the new ones we need to change them too underneath.
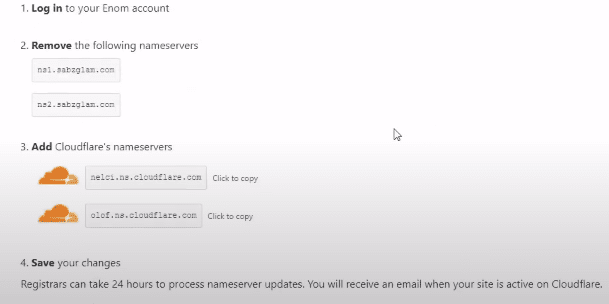
- Now log in to where you have your domain hosted and find the Manage Nameservers Option. From here copy over the name servers provided by Cloudflare in the Nameserver 1 and 2. Make sure to save your changes once you have changed both over.
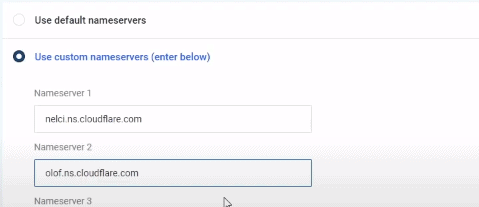
- Return back to the Cloudflare page and select Done, Check Nameservers.
- You will now be given some options in terms of security and optimizing your site.
These are our suggested choices but do it according to your own site.
– Automatic HTTPS Rewrites: ON
– Always Use HTTPS: ON
– Auto minify html, JavaScipt, CSS: Checked (dont check if you already have a optimizing plugin)
– Use Brotli Compression: ON - Now you need to wait for the Nameservers to propagate. This can take form 10 minutes to 24 hours so you will need to be patient. I ussualy wait about 10-15 mins and then click check nameservers or refresh the page.

- Once complete you will get the message below.

- Now login in to your WordPress Site or PBN Blog and install the Cloudflare plugin. And then click activate once installed.
- Now head to settings on you WordPress dashboard and find the new Cloudflare button, select this.
- Insert the email you created the acount with and the API number. You can find this by clicking the button on the top right hand side of your Cloudflare page. Profile and then select My Profile
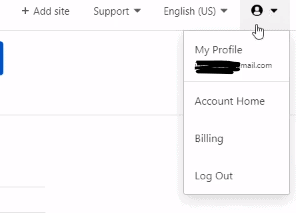
- Now select the API key option, press on view Global API key, complete the captcha and enter your password and it will be provided to you. Now enter this into the window for your Cloudflare plugin on your site.

- On the next page select apply recommended Cloudflare settings for WordPress.
- Go to your WordPress settings and make sure you add the s on the end of the http for both your WordPress address or Site address.


